
With its no-BS interface, Slopes packs smart features that deliver detailed recaps and stat breakdowns of your days on the mountain — giving you a full view of your skiing or snowboarding adventures.
Whether you're learning to ski at your local resort or an expert chasing untracked pow, Slopes can take your snow days to the next level. We’ve put together this Cheatsheet with tips, tricks, taps, swipes, and settings to help you make the most of Slopes.
#1 Tip for Using Slopes - Update
Always make sure you have the latest app version installed on your device. Every season brings new features, and we’re constantly rolling out improvements. During peak season, updates can happen as often as every couple of weeks — so before you hit the mountain, take a moment to ensure your app’s up to date.
Download on the App Store | Get it on Google Play
2. Improve GPS Signal
GPS cutting out mid-run and throwing off your stats? Avoid these common issues to keep your GPS accurate and reliable:
- Too Many Layers: If your phone is buried under too many layers of clothing or tucked too deep in a pocket, it can weaken GPS reception.
- Airplane Mode: It might be tempting to use Airplane or Low Power Mode to save battery, but instead, just turn off cellular data to maintain GPS accuracy.
3. Save on Battery Life
When no other apps are running in the background, a phone with decent battery health can last up to 14 hours on a full charge. But even the best plans can go sideways, right? Here’s a few ways you can make it last longer:
Expand for Details
Social Slopes: No one will keep you off the internet, but you can reduce the time from social media channels & music streaming apps, as they can be a serious drain on the battery.
Warm Enough: Be careful not to place your phone beneath too many layers, as that can mess with GPS, but also stow it in a warm enough place that the cold doesn't zap it.
Lock it Up: Lock your phone once you start recording. Slopes runs smoothly in the background without needing to keep your screen active.
Tone it Down: Lower your screen brightness and turn off keyboard sounds and vibrations.
Apple Watch Advice: The most important thing you can do is keep your phone on you, even while recording through the Watch. When paired, the Watch lets your phone handle GPS tracking while it focuses on heart rate—nearly doubling battery life.
ℹ️ The Series 8, second generation SE and Ultra models don't piggyback off the iPhone's GPS. They use their own built-in GPS, even when your iPhone is nearby. For all other models, we recommend taking your iPhone with you.
4. Be Mountain Ready - Download Your Maps Ahead
Lost signal? No problem. You can save both classic paper-style trails and Slopes’ smooth interactive maps with searchable trail data right to your device. Before you hit the slopes, make sure to lock in your offline maps for your destination.
This feature is reserved for Premium Annual subscribers, offering the best offline experience all season long. Day Passes do not unlock the Offline Maps option.
5. Locate Your Friends on the Mountain
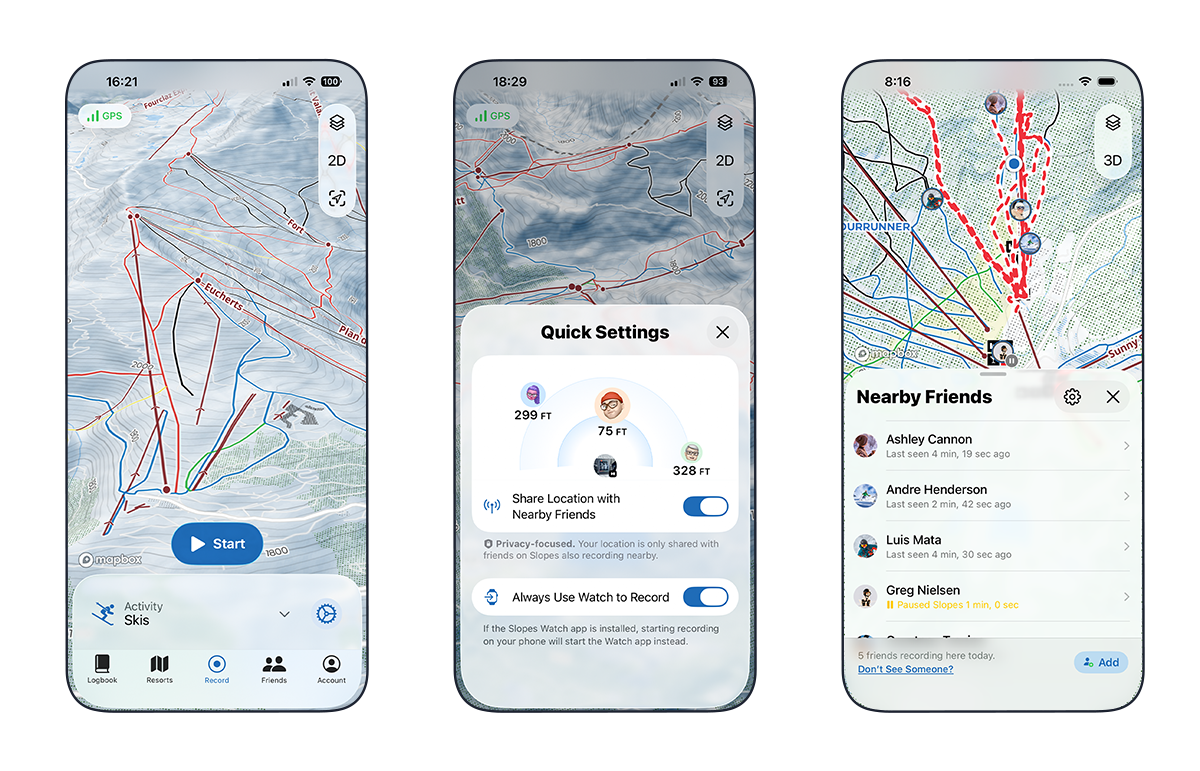
Never lose track of your friends on the slopes again. Slopes supports live Location Sharing — make sure "Share Location with Nearby Friends" is enabled when you start recording. Once enabled, you’ll see friends who are recording at the same resort (if they’ve turned on sharing too), and they can see you.
Expand for Details
The feature is free and built with privacy in mind. Only friends who are also recording at the same resort — or within two miles in the backcountry — can see your location. And if you ever want some solo time, you can turn it off anytime to go incognito.
Troubleshooting: Location Sharing uses cell data, so poor reception may cause your location (or your friends’) to appear a bit outdated. Just know — it’s not us, it’s 📶.
6. Find Me - Share a Temporary Safety Web Link
There are times you might want to let someone who’s not on the mountain follow along. Slopes makes that easy by letting you generate a temporary web link to your live activity.
Expand for Details
On mobile, you’ll find the link when expanding the "•••" menu while Recording. On watchOS, scroll to the bottom of the Nearby screen, and you’ll see the share option there.
The link stays active only while you're recording. Once you hit End, it expires and no one can view your location anymore.
7. See Exactly Where You Broke a Record — Smart Shortcut (Premium Feature)
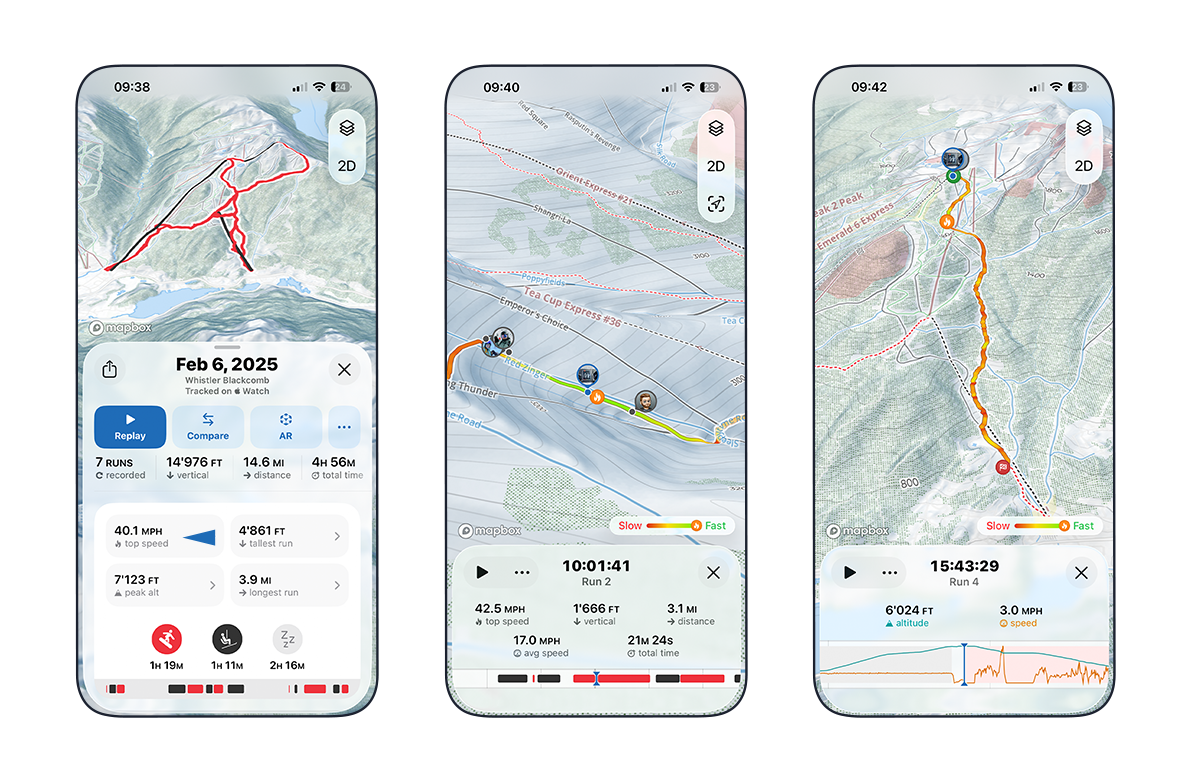
One handy trick in the Activity Summary lets you pinpoint exactly when you hit top speed, logged your longest run, or reached your peak heart rate.
Check the Key Stats and/or Fitness sections of your day, tap the stat you want to explore, and Slopes will jump straight to that moment in the Timeline when it was recorded. Pretty neat, right? 😉
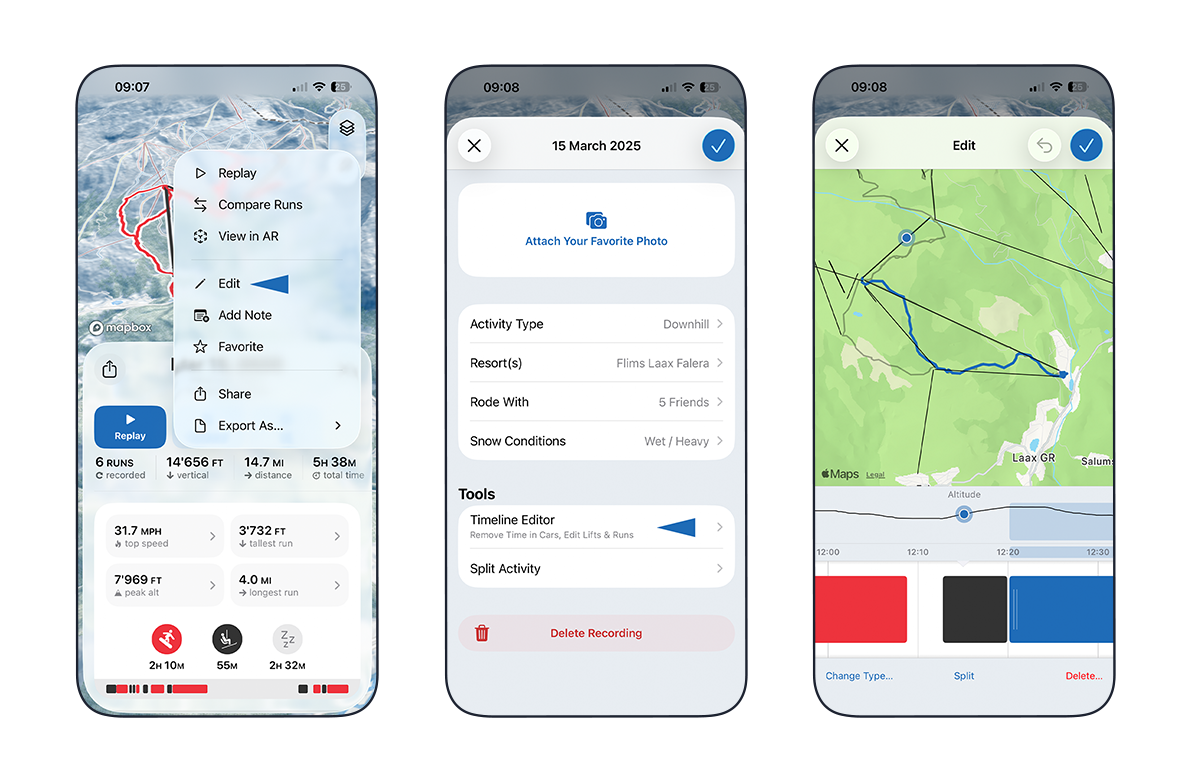
8. Edit Your Day – Trim Off the Drive Away for Accurate Stats
There’s nothing more frustrating than realizing you left Slopes running after hopping back in the car — throwing your stats completely off. Unless, of course, you’re trying to claim that top speed from the highway 😉.
Expand for Details
The Timeline Editor gives you control to add, edit, or delete activities right in the app. Accidentally tracked your drive home? Trim it out. Forgot to start recording and want to fill in the missed time? Just tap Edit, and you’ll be able to adjust your day however you need.
9. Replay Your Day on the Timeline View
All your recordings live in the Logbook, listed as individual Activities. Each one includes detailed stats from your day, along with an interactive timeline and map that show every run and lift you took.
Expand for Details
The Timeline is a full replay of your day, with an interactive map at the top and a time scrubber at the bottom. Tap Play, or manually swipe the band, and watch as your day unfolds — lifts, runs, and stats all move in sync.
This view lets you relive your day run by run, swipe and zoom your way, and even compare different parts of your session.
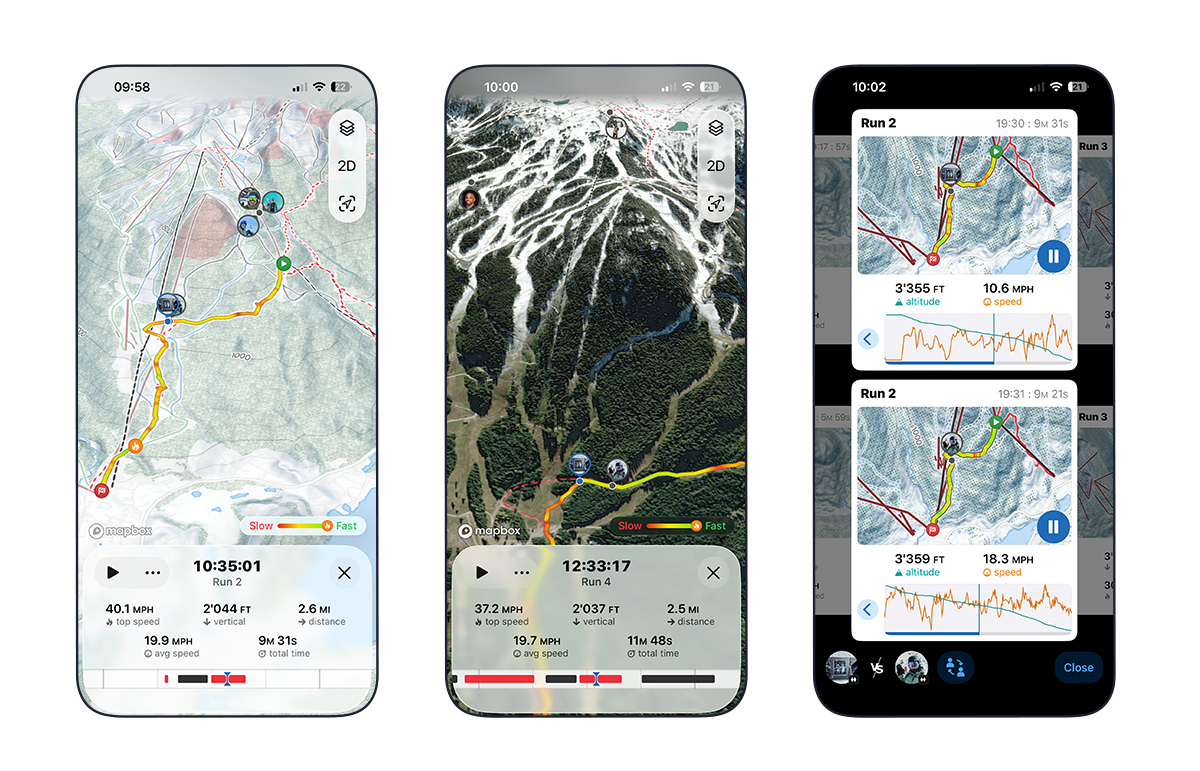
10. Compare Runs (Premium Feature)
Ever hit the same run a few times and push just a little harder on that last lap? It’s super easy to see the results of your efforts! Premium users can bring up two runs side by side and compare them in detail.
Even cooler (IMO)—this works with friends you rode with too. See who is sustaining the best speed, taking the most breaks, and get a full picture of how each run stacked up.
11. How We Measure Top Speed
Slopes measures sustained top speed—which means you need to hold that speed for a moment or two for it to count in your stats.
Expand for Details
For most riders this works just fine; but if you're cruising at 30mph and zip up to 45 for 2 seconds and then settle back down, Slopes might log it closer to 43 or 44 mph.This built‑in smoothing helps filter out GPS spikes and unreliable data, giving you a more realistic look at your performance and progress over time.
12. Keep Your Group Connected with Trips Planner
The countdown has begun and the group chat is buzzing with “Are you coming? Who’s joining?” Trips Planner is your one-stop solution for planning, inviting friends, and keeping tabs on trip details, all in one place.
While you're on a trip, you can see everyone's locations even if you're not recording. It’s perfect for tracking down stragglers after ending your activity or figuring out where to meet if you're joining late.
 Slopes
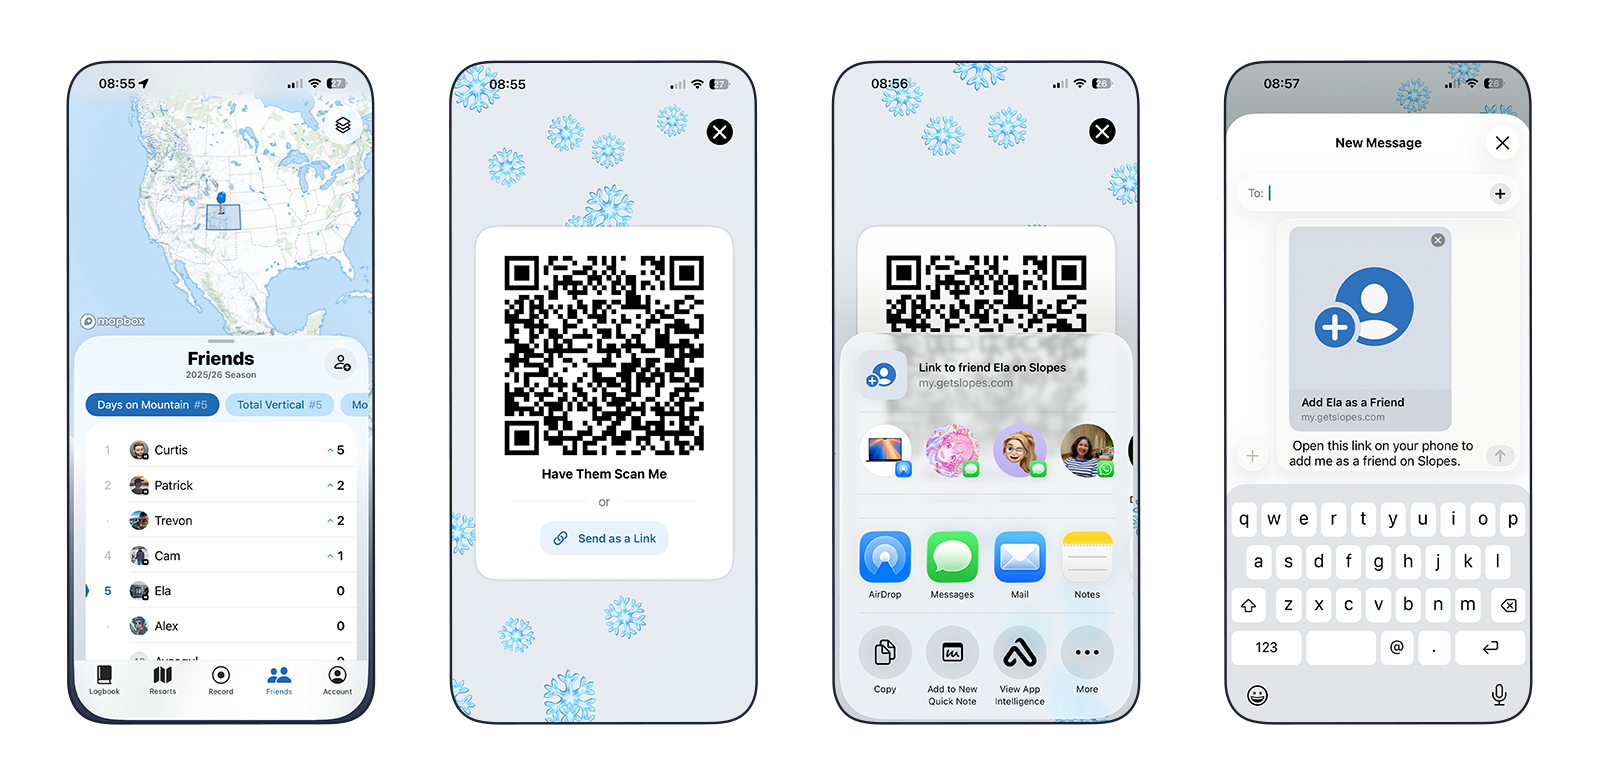
13. Add All Your Ski Buddies and Climb the Leaderboards
Friends on Slopes work a little differently than on other social networks—by design! There are no public profiles or usernames. Instead, Slopes keeps things simple and private by connecting you through an initial friend link. This goes a long way to avoid creepy strangers sliding into your DMs, bots, harassment, and other unwanted interactions.
Expand for Details
Adding a friend is quick and easy: tap the + button in the top right of the Friends tab and use the share sheet to send your friend link however you like. On their end, they just tap the link to open Slopes and confirm the request.Need to remove someone? Head to the Account tab, tap your profile at the top, and choose Manage Friends.
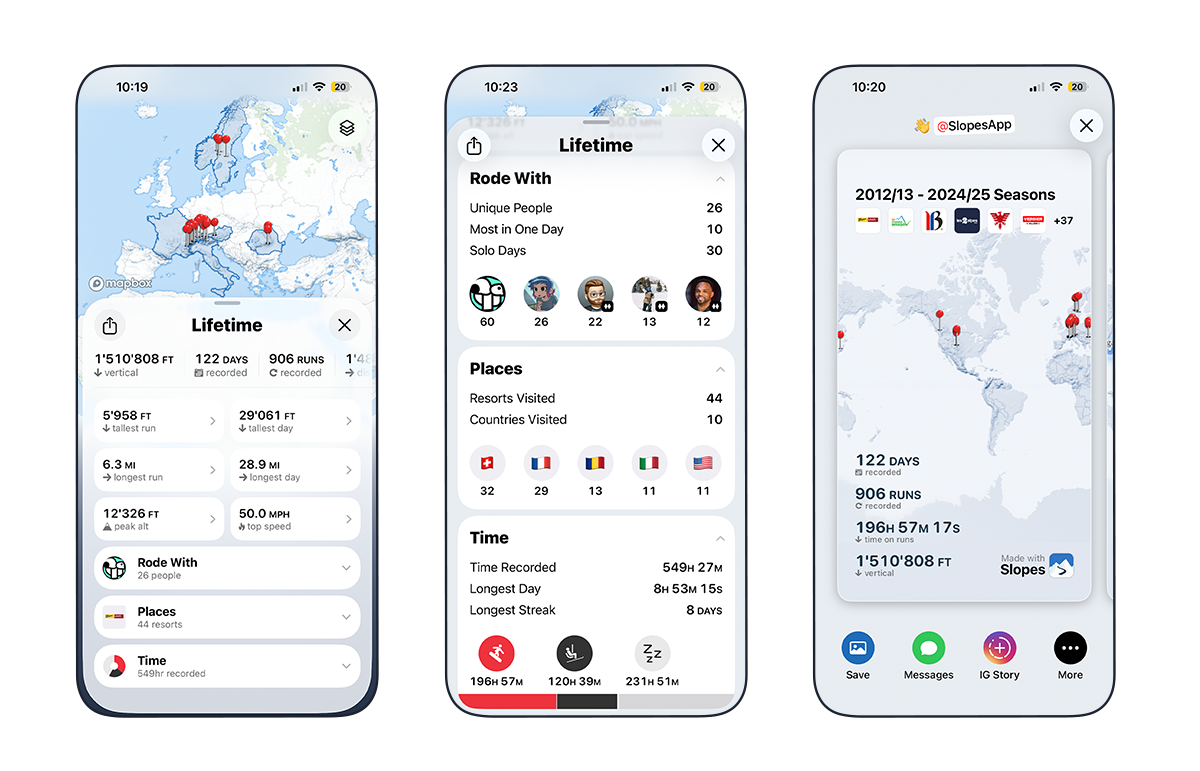
14. Review Your Lifetime Stats
Ever wondered which resort you’ve visited most, your lifetime peak altitude, or your all‑time top speed? Curious how many days you’ve spent riding downhill? Tap the Lifetime Stats summary at the top of your Logbook to explore all the details.
Expand for Details
You can check out your Season Stats and Trip Stats in a similar way — just open a Season or Trip Summary to see everything at a glance.
Bonus: Hit 1 million vertical feet recorded with Slopes, share it on IG story, and we'll get you into the Slopes Million Vertical Club. It’s a pretty exclusive crew — it takes most riders around 100 days on the mountain to earn that spot.
15. Import Activities From Other Apps
New to Slopes? Why not take a few minutes to import your data from other apps that are compatible with Slopes? This way, you can have all your epic winters in one place.

16. Export Activities From Slopes
You can easily export your activity data recorded with Slopes. It's your data, and we will always make sure you can get to it. Slopes can export in GPX, KMZ, and a Slopes backup file.

17. Connect to Strava
While Slopes itself doesn’t include public-facing profiles, that doesn’t mean you can’t share your achievements with the world if you want. That’s why we created an easy integration with Strava, allowing you to post your daily recaps directly to your Strava feed.
Link the two by going into the Account Tab → Integrations → Upload to Strava.
Why am I seeing inaccurate data in Strava?
Some of you might notice your Strava data doesn’t match Slopes. This happens because the Slopes algorithm filters out lift time and counts only run time for total distance, but Strava often combines them.
For speed, Slopes sends detailed data, but Strava uses its own GPS calculations, causing average and max speed to appear incorrect.
We have raised these issues with our Strava partnership contact, and we continue to remind them that it is causing frustration for our mutual users.
Why doesn't heart rate get sent to Strava?
We don’t send heart rate data to Strava because it never leaves your device or Apple Health. We don’t collect or store it, so it can’t be shared. We know there’s demand for this, and we’re exploring solutions for future updates.
18. Connect to Garmin
Link your Garmin Connect and Slopes accounts, and Garmin Connect Autosync will automatically import your ski and snowboard activities. Once authorized, your last 5 years of Garmin snow history will be imported too (duplicates skipped).
Expand for Details
Good to Know: Missing Lifts & Heart Rate Data
Garmin’s autorun feature automatically records downhill runs and pauses the timer during chairlift rides. Since lift data isn’t recorded in Garmin Connect, it won’t appear in Slopes, and stats reflect only active run time. Heart rate data is missing during lifts or other non-skiing activities, which may increase "Resting" time even if your heart rate remains elevated between runs
19. Health Connect & Google Fit Integration
If you use an Android wearable or device that sends data to Google’s Health APIs, Health Connect can sync this fitness data into Slopes.
Expand for Details
Go to Account Tab → Online Integrations → Choose Google Fit as the Health Source and follow the prompts.
Slopes Premium users get detailed fitness insights in the daily summary, including heart rate analytics from Google Fit, Samsung Health, and more.
20. Find the Slopes Guy
Love Where’s Waldo? Track down Curtis on the slopes, say “Hi!” in person, and earn exclusive swag, including the rare “I met the Slopes guy” pin.
Expand for Details
This elusive Free Stealth Pin is only for those who’ve met Curtis in person. With Curtis now based in Colorado and often traveling internationally, there’s a good chance you can track him down. His live location is always ON while recording, so you can find and follow him here: Live Location for Curtis.
He's also pretty open about his plans and presence at different resorts on IG stories and posts, so if you’re in for the quest, follow @slopesapp and find out where he'll be next.
Hope we surprised you with at least one thing you didn’t know about Slopes, but most of all, that you found new joy in using and playing with the app. See you on the Slopes 🌨🤞!